Search This Blog

Showing posts with label vmware. Show all posts

vmkfstools Examples

When searching an issue on expanding a shared disk on Microsoft clustering VMs (CIB), I have learned more about the vmkfstools command.

The vmkfstools --help displays many options, but lack of explanation. So I document them here. (reference: vSphere Storage, Using vmkfstools)

# vmkfstools --help

OPTIONS FOR FILE SYSTEMS:

vmkfstools -C --createfs [vmfs3|vmfs5]
               -b --blocksize #[mMkK]
               -S --setfsname fsName
           -Z --spanfs span-partition
           -G --growfs grown-partition
   deviceName

           -P --queryfs -h --humanreadable
           -T --upgradevmfs
   vmfsPath
           -y --reclaimBlocks vmfsPath [--reclaimBlocksUnit #blocks]

OPTIONS FOR VIRTUAL DISKS:

vmkfstools -c --createvirtualdisk #[gGmMkK]
               -d --diskformat [zeroedthick
                               |thin
                               |eagerzeroedthick
                               ]
               -a --adaptertype [buslogic|lsilogic|ide
                                |lsisas|pvscsi]
               -W --objecttype [file|vsan]
               --policyFile <fileName>
           -w --writezeros
           -j --inflatedisk
           -k --eagerzero
           -K --punchzero
           -U --deletevirtualdisk
           -E --renamevirtualdisk srcDisk
           -i --clonevirtualdisk srcDisk
               -d --diskformat [zeroedthick
                               |thin
                               |eagerzeroedthick
                               |rdm:<device>|rdmp:<device>
                               |2gbsparse]
               -W --object [file|vsan]
               --policyFile <fileName>
               -N --avoidnativeclone
           -X --extendvirtualdisk #[gGmMkK]
               [-d --diskformat eagerzeroedthick]
           -M --migratevirtualdisk
           -r --createrdm /vmfs/devices/disks/...
           -q --queryrdm
           -z --createrdmpassthru /vmfs/devices/disks/...
           -v --verbose #
           -g --geometry
           -x --fix [check|repair]
           -e --chainConsistent
           -Q --objecttype name/value pair
           --uniqueblocks childDisk
   vmfsPath

OPTIONS FOR DEVICES:

           -L --lock [reserve|release|lunreset|targetreset|busreset|readkeys|readresv
                     ] /vmfs/devices/disks/...
           -B --breaklock /vmfs/devices/disks/...

vmkfstools -H --help

vmkfstools Command Syntax

vmkfstools options target

Options: separate into three types - File System Options, Virtual Disk Options, and Storage Device Options.
Target: partition, device, or path

File System Options

  • Listing Attributes of a VMFS Volume
    The listed attributes include the file system label, if any, the number of extents comprising the specified VMFS volume, the UUID, and a listing of the device names where each extent resides.
    vmkfstools -P -h <vmfsVolumePath>
    vmkfstools -P -h /vmfs/volumes/netapp_sata_nfs1/
  • Creating a VMFS Datastore
    vmkfstools -C vmfs5 -b <blocksize> -S <datastoreName> <partitionName>
    vmkfstools -C vmfs5 -b 1m -S my_vmfs /vmfs/devices/disks/naa.
    ID:1
  • Extending an Existing VMFS Volume
    vmkfstools -Z <span_partition> <head_partition>
    vmkfstools -Z /vmfs/devices/disks/naa.disk_ID_2:1 /vmfs/devices/disks/naa.disk_ID_1:1
    Caution: When you run this option, you lose all data that previously existed on the SCSI device you specified in span_partition.
  • Growing an Existing Extent
    vmkfstools –G device device
    vmkfstools --growfs /vmfs/devices/disks/disk_ID:1 /vmfs/devices/disks/disk_ID:1

Virtual Disk Options

  • Creating a Virtual Disk
    vmkfstools -c <size> -d <diskformat> <vmdkFile>
    vmkfstools -c 2048m testdisk1.vmdk
  • Initializing a Virtual Disk
    vmkfstools -w <vmdkFile>
    This option cleans the virtual disk by writing zeros over all its data. Depending on the size of your virtual disk and the I/O bandwidth to the device hosting the virtual disk, completing this command might take a long time.
    Caution: When you use this command, you lose any existing data on the virtual disk.
  • Inflating a Thin Virtual Disk
    vmkfstools -j <vmdkFile>
    This option converts a thin virtual disk to eagerzeroedthick, preserving all existing data. The option allocates and zeroes out any blocks that are not already allocated.
  • Removing Zeroed Blocks (Converting a virtual disk to a thin disk)
    vmkfstools -K <vmdkFile>
    Use the vmkfstools command to convert any thin, zeroedthick, or eagerzeroedthick virtual disk to a thin disk with zeroed blocks removed.
    This option deallocates all zeroed out blocks and leaves only those blocks that were allocated previously and contain valid data. The resulting virtual disk is in thin format.
  • Converting a Zeroedthick Virtual Disk to an Eagerzeroedthick Disk
    vmkfstools -k <vmdkFile>
    Use the vmkfstools command to convert any zeroedthick virtual disk to an eagerzeroedthick disk. While performing the conversion, this option preserves any data on the virtual disk.
  • Deleting a Virtual Disk
    vmkfstools -U <vmdkFile>
    This option deletes files associated with the virtual disk listed at the specified path on the VMFS volume.
  • Renaming a Virtual Disk
    vmkfstools -E <oldName> <newName>
  • Cloning or Converting a Virtual Disk or Raw Disk
    cloning:
    vmkfstools -i <sourceVmdkFile> <targetVmdkFile>
    vmkfstools -i /vmfs/volumes/templates/gold-master.vmdk /vmfs/volumes/myVMFS/myOS.vmdk
    converting: vmkfstools -i <sourceVmdkFile> -d <diskfomrat> <targetVmdkFile>
  • Extending a Virtual Disk
    vmkfstools -X <newSize> [-d eagerzeroedthick] <vmdkFile>
    use -d eagerzeroedthick to ensure the extended disk in eagerzeroedthick format.
    Caution: do not extend the base disk of a virtual machine that has snapshots associated with it. If you do, you can no longer commit the snapshot or revert the base disk to its original size.
  • Displaying Virtual Disk Geometry
    vmkfstools -g <vmdkFile>
    The output is in the form: Geometry information C/H/S, where C represents the number of cylinders, H represents the number of heads, and S represents the number of sectors.
  • Checking and Repairing Virtual Disks
    vmkfstools -x <vmdkFile>
    Use this option to check or repair a virtual disk in case of an unclean shutdown

Storage Device Options

  • Managing SCSI Reservation of LUNs
    Caution: Using the -L option can interrupt the operations of other servers on a SAN. Use the -L option only when troubleshooting clustering setups.
    • vmkfstools -L reserve <deviceName>
      Reserves the specified LUN. After the reservation, only the server that reserved that LUN can access it. If other servers attempt to access that LUN, a reservation error results
    • vmkfstools -L release <deviceName>
      Releases the reservation on the specified LUN. Other servers can access the LUN again
    • vmkfstools -L lunreset <deviceName>
      Resets the specified LUN by clearing any reservation on the LUN and making the LUN available to all servers again. The reset does not affect any of the other LUNs on the device. If another LUN on the device is reserved, it remains reserved
    • vmkfstools -L targetreset <deviceName>
      Resets the entire target. The reset clears any reservations on all the LUNs associated with that target and makes the LUNs available to all servers again.
    • vmkfstools -L busrest <deviceName>
      Resets all accessible targets on the bus. The reset clears any reservation on all the LUNs accessible through the bus and makes them available to all servers agai
    • When entering the device parameter, use the following format:
      /vmfs/devices/disks/vml.vml_ID:P

Hidden Options (reference: “Some useful vmkfstools ‘hidden’ options”)

  • VMDK Block Mappings
    vmkfstools -t0 <vmdkFile>
    Display the chuck file format in a VMDK file.
    • VMFS -- = eager zeroed thick
    • VMFS Z- = lazy zeroed thick
    • NOMP -- = thin
Do Not Upgrade Dell Server with H730 and FD332-PERC Controller to VSAN 6.2

VMware released VSAN 6.2 on March 15, 2016. However, if your VSAN is running on a Dell server with H730 or FD332-PERC controller, do not upgrade to VSAN 6.2.

See KB2144614 for more information.

Fix “Deprecated VMFS volume(s) found on the host” in vSphere 6.x

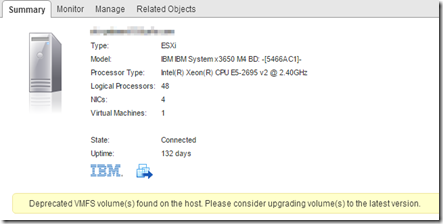
An ESXi 6.x host shows an warning message “Deprecated VMFS volume(s) found on the host. Please consider upgrading volume(s) to the latest version.”

vsphere.6.deprecated.vmfs.warning

After verifying all the datastores mounted on the host are VMFS5, I restarted the management agent on the host. That cleared the warning.

This is a known issue on vSphere 6 (KB2109735).

VSAN Free Storage Catches

VSAN is a hot topic nowadays. Once it is set up, it’s easy to management and use. No more creating LUN and zoning.

We recently experienced some catches about its free available storage - at least we didn’t think about or were told before; or maybe our expectation to VSAN was too positive.

Our VSAN hardware disk configuration:

  • 3 x Dell PowerEdge R730 nodes
  • 2 x 400 GB SDD per node (372.61 GB is shown in VSAN Disk Management)
  • 14 x 1 TB SATA per node (931.51 GB is shown in VSAN Disk Management)
  • Two disk groups (7 SATA + 1 SSD) per node

Calculation of each node storage capacity (RAW):

931.51 x 14 = 13,041.14 GB = 12.73549 TB

Total storage capacity (RAW)

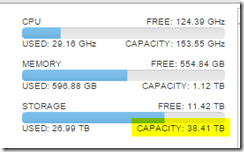
931.51 x 14 x 3 = 39,123.42 GB = 38.20646 TB

This calculation matches the storage capacity shown in the VSAN Cluster’s Summary.

vsan.total.storage.capacity

We are adding more VMs to the VSAN. Once the free storage drops below about 12 TB (about one node’s RAW capacity), the VSAN health check starts showing critical alert “Limits Health - After 1 additional host failure” (KB2108743).

vsan.health.alert

And the component resyncing starts more frequently.

vsan.resyncing.components

My take away:

  • I understand there is an overhead for VSAN (or any storage product) to offer the redundancy. But the way VSAN displaying the free storage is quite difference than the traditional SAN storage and it can be confused. The free storage shown in VSAN does not mean you should use it. Otherwise, the VMs may be down when a host is down or taken down for maintenance.
  • The used storage in the Summary tab is the previsioned storage, not the actual space in use.
  • The frequent resyncing component can potentially impact the overall VSAN storage performance.

Recover Microsoft Cluster VMs Not Power On After Migration

A lesson to remember if you do not have the time to read this entire post: do not migrate the cluster VMs without fully understanding the impact.

Here is our story.

We had a Microsoft SQL 2008 Cluster VMs in the CIB (see my previous post about various Microsoft Cluster VMs configuration). The shared disks of the cluster VMs were on an EMC SAN. When the free space of EMC SAN was running low, an engineer migrated the cluster VMs (the VMs were powered off during the migration) to the VSAN v.6.1 hosts and storage. The migration completed successfully, but the VMs would not power on with the error message “Cannot use non-thick disks with clustering enabled (sharedBus='physical'). The disk for scsi1:0 is of the type thin.”

Because VSAN does not support Microsoft Cluster with the shared disk (non shared disk cluster, e.g. SQL AlwaysOn Availability Group is supported), this is no option but migrating the VMs back to the original hosts and SAN storage.

PS: In this case, the new target storage is VSAN. I think if the new target storage were the traditional SAN,  the cluster would break too. Because the cluster VMs were not shared anymore after the migration (see below). But you probably could recover the cluster by reconfiguring the VMs to share the shared disks without migrating the VMs back to the original storage.

When we reviewed the disks of the migrated VMs on the VSAN storage, each VM had its own copy of the shared disks. So the cluster VMs were not shared the shared disks any more. We could not simply migrate the VMs back to the original hosts and SAN storage.

When we reviewed the original EMC SAN storage, the VMDK files of the shared disks were still left there, only the non shared disk (e.g. the OS’s C drive) was completely migrated to the VSAN storage.

vmdk.files.left.on.the.san

Recovery Procedure:

  1. Document the SCSI controller ID (e.g. SCSI (1:0)) of each shared disk from the migrated VMs. This may not be very important. But we are going to use the same SCSI controller for each corresponding disk when re-adding the shared disks
  2. Since the VMDK files of the shared disks were still left on the original SAN storage, we can speed up the recovery by migrating the non shared disks of each VMs only. In this case, we are only migrating the hard disk 1 of each VM (the OS drive) back to the original SAN.
  3. How to migrate only the OS drive back to the original host and storage? We used VMware vCenter Converter, and only select the hard disk 1. This worked beautifully.
    • vmware.converter.select.os.drive.only
  4. PS. In this case the VMs were migrated to the VSAN storage. We could not use scp to copy the VMDK file manually between the hosts. If we want to use scp, we need to migrate the VMDK files to a non-VSAN storage first. This is why I think vCenter Converter is the best tool in this case.
  5. Now the non-shared disk of each VM are back to the original host and SAN storage. Make sure both VMs are registered on the same ESXi host.
  6. If the VMs were not on the same ESXi host, use Migrate, Change host, check the checkbox “Allow host selection with this cluster” (this option is not selected by default) to put both VMs on the same ESXi host.
    • vm.migrate.allow.host.selection
  7. Re-add the SCSI controller(s) to the first VM and set the SCSI Bus Sharing to Virtual
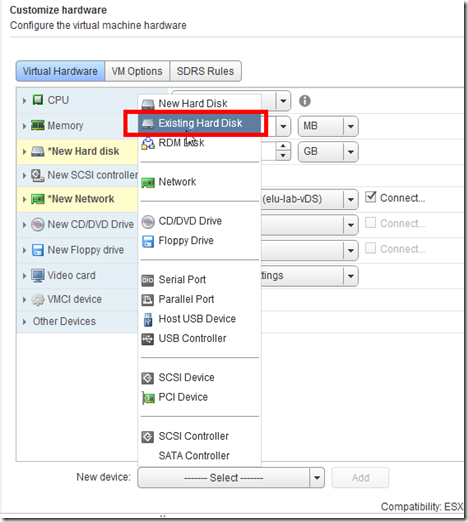
  8. Re-add the shared disks using the existing VMDK files to the first VM; match the SCSI ID documented in the first step. We also make sure the order of the hard drives matching the original VM’s configuration
    • re-add.hard.drive.with.existing.vmdk 
  9. Power on the first VM
  10. Log in Windows and verify the shared drives’ drive assignments are correct
  11. Launch Failover Cluster Manager to verify the cluster services and applications are online
  12. Re-add the SCSI controller(s) to the second VM and set the SCSI Bus Sharing to Virtual
  13. Re-add the shared disks using the existing VMDK files to the second VM; match the SCSI ID documented in the first step
  14. Power on the second VM
  15. Log in Windows and verify no shared drive is shown in Windows Explorer, and they should be shown “reserved” in the Disk Management
  16. Launch Failover Cluster Manager to verify the second node is online

Fix A SAN Datastore Inaccessible On A ESXi Host

A SAN datastore is shown inaccessible on one of the ESXi hosts in the cluster. Other ESXi hosts can access that datastore without problem.

esxi.host.datastore.inaccessible

Solution: restart the ESXi management agents on the ESXi host

There are a few ways to restart the management agents (KB1003490).

  • From the Direct Console User Interface (DCUI)
    • Press F2 to customize the system
    • Log in as root
    • Under Troubleshooting Options, select Restart Management Agents
  • From the Local Console (Alt + F2) or SSH
    • Log in as root
    • run these commands
      • /etc/init.d/hostd restart
      • /etc/init.d/vpxa restart
      • if the hostd is not restart, use KB1005566 to find and kill hostd Process ID (PID), then start it again (/etc/init.d/hostd start)
  • alternatively
    • To reset the management network on a specific VMkernel interface, by default vmk0
      • esxcli network ip interface set -e false -i vmk0; esxcli network ip interface set -e true -i vmk0
      • Note: run the above commands together, using a semicolon (;) between the two commands
    • To restart all management agents on the host
      • services.sh restart
      • Caution:
        • check if LACP is enabled on the VDS’s Uplink Port Group
        • If LACP is not configured, the services.sh script can be safely executed
        • If LACP is enabled and configured, do not restart management services using services.sh. Instead restart independent services using /etc/init.d/hostd restart and /etc/init.d/vpxa restart.
        • If the issue is not resolved, take a downtime before restarting all services with services.sh

vMotion Microsoft Cluster VMs

vSphere supports three different configurations of Microsoft Cluster Service (MSCS):

  • Clustering MSCS VMs on a single host (aka a cluster in a box - CIB)
  • Clustering MSCS VMs across physical hosts (aka a cluster across boxes - CAB)
  • Clustering physical machines with VM

see Setup for Failover Clustering and Microsoft Cluster Service, ESXi 6.0 for more information.

However, vMotion is supported only for CAB with pass-through RDMs. Do not vMotion MSCS VMs in the other two configuration.

In addition, do not vMotion MSCS VMs to a VSAN storage, because VSAN does not support thick provision and SCSI bus sharing on the VM SCSI adapter. The VM will not be able to power on with the error message “Cannot use non-thick disks with clustering enabled (sharedBus='physical'). The disk for scsi1:0 is of the type thin.”

Multiple vCPUs Can Cause Performance Issues

Assigning more hardware resource (aka overprovisioning) on a VM can cause performance issues.

According to KB1005362, we can use esxtop to check the %CSTP value to determine vCPUs overprovisioning. If the value of a VM is higher than 3.00, the performance issue may be caused by the vCPU count. Try lowering the vCPU count of the VM by 1.

VM.Multiple.vCPU.Performance.Issue

Understand Three Important Files in vSphere HA

This post is the note I take as I am reading the vSphere 6.x HA Deepdive book, plus my understanding of the materials.

Here we focuse on the files stored on the shared datastore, aka. remote files. Each host also restores some configuration files in a directly accessible datastore, aka. local files)

  • Protectedlist file
    • Naming: protectedlist
    • Owner: The master locks this protectedlist file
    • The master uses this file to claim the “ownership” of the datastores stored the VM configuration file. When a host is isolated, if the host can access the datastore, then it will validate whether a master owns the datastores. If no master owns the datastores, the isolation response will not be triggered and restarts will not be initiated. (see page 29 & 30 of the book about isolation response).
    • The master uses this protectedlist file to track the VMs protected by HA and the states of the VMs (powered on / off)
    • The master distributes this protectedlist file to all datastores in use by the VMs in the cluster
  • "poweron" file
    • Naming: host-<number>-poweron
    • Owner: per-host (master & slaves)
    • The host uses this "poweron" file to track the powered on virtual machines on a host
    • The slaves use this "poweron" file to inform the master that it is isolated from the management network
      • No datastore heartbeat: the master determines a host has failed
      • The top line of "poweron" file is 1 (means isolated); if 0 means not-isolated
  • Heartbeat file
    • Naming: host-<number>-hb
    • Owner: per-host
    • Each host creates a heartbeat file on the designed heartbeating datastores
      • On VMFS datastore, "heartbeat region" is used to check the heartbeat update
      • On NFS database, the time-stamp of the file is check (each host writes to its heartbeat file once every 5 seconds)

VMware vFlash Read Cache (VFRC) Notes

  • Available in vSphere 5.5 and 6.0 for basic caching solution
    • VMware introduces vSphere APIs for IO Filtering (VAIO) in vSphere 6.0 U1 as a new API framework for third party’s innovation
    • VAIO is not a feature or product.
    • It seems that VMware has no plan to create new caching product based on VAIO
    • VAIO can be used not only caching but also for replication
  • Some third party product can provide more advanced caching solution (both read and write-back cache, e.g. PernixData FVP)
  • Require Enterprise Plus License
  • Use local SSDs (must be on the HCL) to form a new file system called VFFS (Virtual Flash File System) to provide two types of write through (read only) caching
    • Per-VMDK cache
    • Host Swap cache
  • VFRC limitation (KB2057206)
    • Default VRFC maximum size is 200GB. Can be set to 400GB
  • Configuration
    1. Set up VFRC resouce on a host
      • vSphere Web Client, host, Manage, Settings, Virtual Flash Read Cache Resource Management, Add capacity
    2. Allocate VFRC to a VM’s VMDK
      • vSphere Web Client, VM,  Edit Settings, select and expand the hard disk,and enter the amount of VFRC
      • The block size can impact performance, but it’s not easy to determine (see this post for detail)
    3. Set up Host Swap Cache
      • vSphere Web Client, host, Manage, Settings, under Virtual Flash, edit Virtual Flash Host Swap Cache Configuration, Enable virtual flash host swap cache and enter the amount

Fix A VSAN Host Shows 0 of 0 Disks In Use

We have three hosts running on VSAN 6.1. Today the Disk Management in vSphere Client shows one of the hosts 0 of 0 Disk in Use.

VSAN.Disk.Missing.01

And in VSAN General, it shows the warning of Mixed On-disk Format Version, and there is an upgrade button next to it. (Do Not Click It - I didn’t click it, and am not sure what the impact would be). Because our VSAN environment is built from scratch with VSAN 6.1, it is not upgrade from VSAN 5.5. It does not make sense the disk format requires an upgrade.

VSAN.Disk.Missing.02

Troubleshoot

  • Run VSAN Health check, everthing is green.

VSAN.Disk.Missing.03

  • The affected host shows all the disks under its Manage, Storage, Storage Devices.

VSAN.Disk.Missing.04

Solution

  • Click the first icon under Storage Devices to refresh the host’s storage information.

VSAN.Disk.Missing.05

Now the Disk Management and On Disk Fromat are back to normal.

VSAN.Disk.Missing.06

VSAN.Disk.Missing.07

Configure ESXi Network Dump Collector

When booting the ESXi from a SD, you probably need to reconfigure the ESXi dump collector location to a persistent datastore or a network dump collector.

The reason is the ESXi installer puts the scratch partition in “/tmp/scratch” on the local ramdisk. see the quote below from Booting ESXi off USB/SD.

3.  Where does the scratch partition get placed when booting from USB?

Because USB/SD devices are sensitive to high amounts of I/O the installer will not place the scratch partition on a USB/SD device.  Instead, the installer first scans for a local 4GB vfat partition, if it doesn’t find one it will then scan for a local VMFS volume on which to create a scratch directory.  If no local vfat partition or VMFS volume is found, as a last resort the installer will put the scratch partition in “/tmp/scratch” (i.e. put scratch on the local ramdisk).  If this happens it’s a good idea to manually reconfigure the scratch partition after the install.

The persistent store can be any available datastore (NFS, FC, iSCSI, local), except the VSAN datastore. If the ESXi host is a VSAN host, it’s likely you need to use the network dump collector instead of the persistent datastore.

There are two parts to set up the network dump collector:

  1. On the VCSA: Enable VMware vSphere ESXi Dump Collector service via vSphere Web Client
    • Administration, System Configurations, Services, VMware vSphere ESXi Dump Collector
    • Actions, Edit Startup Type, Automatic
    • Actions, Start
    • Note: the coredump file location is /var/core/netdumps
  2. On each ESXi host:
    • SSH to the ESXi host
    • esxcli system coredump network get
    • esxcli system coredump network set --interface-name <vmk0> --server-ipv4 <VCSA-IP-Address> --server-port 6500
    • esxcli system coredump network set --enable true
    • esxcli system coredump network check
      • or check the VCSA log file /var/log/vmware/netdumper/netdumper.log
    • /sbin/auto-backup.sh
      • to save the configuration file to persist after a reboot

See more info from “Booting ESXi off USB/SD”, KB2002955, Configure and Test of ESXi Dump Collector.

Removing Snapshots Can Cause VM Unresponsive

The first thing to remember is not to keep a VM snapshot for a long time – e.g. a few days for a busy VM. Because it

  • Can impact the VM performance and
  • Can cause the VM unresponsive when removing the snapshot (see KB1002836)

The second thing to remember is that removing or consolidating VM snapshots (particular a VM with a large snapshot file) when the VM is not busy.

Roll Back to A Previous Version of ESXi

Here are the steps to roll back to a perviouse version of ESXi: (source: KB1033604)

  1. Reboot the ESXi host
  2. When the hypervisor progress bar starts loading, press Shift + R.
  3. On the pop-up warning message “Current hypervisor will permanently be replaced with build: X.X.X-XXXXXX. Are you sure? [Y/n]”
  4. Press Shift + Y to roll back the build
  5. Press Enter to boot

Fix “Failed to install the hcmon driver” Error on Windows 10 When Installing VMware Remote Console

  • Launch Windows PowerShell as Administrator
  • Change directory to the folder where the VMware-VMRC-xxx.msi is located
  • Execute .\VMware-VMRC-xxx.msi

VM Hard Disk’s VMDK Files

Each hard disk of a VM consists of two .vmdk files:

  • one is a text file (descriptor file) containing descriptive data about the virtual hard disk; the name of the file is myvm.vmdk
  • the second is the actual content of the disk; the name of the file is myvm-flat.vmdk

Normally when browsing the datastore in the vSphere Web or C# Client, only the first .vmdk file is showed, and the size of the file is showed the total of both .vmdk files. I used to mislead by this and thought only one .vmdk for each VM hard disk.

VMDK.1
only one .vmdk file is showed, and note its size and type

But when SSH to the ESXi host and list the content in the VM folder, both .vmdk files are showed.

VMDK.2

If you manually move the first .vmdk file to another folder using the vSphere Client (when the VM is powered off), the –flat.vmdk file will show in the datastore when browsing in the vSphere Client.

VMDK.3
moving the .vmdk file to a different folder

VMDK.4
after moving, the .vmdk file is at the new location, but its size and type are changed

VMDK.5
after moving, the –flat.vmdk file is showed at the original location. note its size and type

Downgrade Virtual Machine Hardware Version in vSphere

Each major release of VMware vSphere comes with a newer virtual machine hardware version that provides the latest features. In order to unlock these features in an existing VM, the VM needs to be migrated to the new ESXi host and upgrade its hardware version.

Upgrading a VM’s hardware version is simple: power off the VM; in the vSphere Web client, right-click on the VM and select Compatibility and Upgrade VM Compatibility.

Once its hardware version is upgraded, the VM cannot boot in the older ESXi host any more. To downgrade the hardware version, there are three options according to VMware KB1028019:

  • Revert to a snapshot created before upgrading the VM hardware version
  • Use VMware vCenter Converter Standalone and select the required VM hardware version in the Specify Destination wizard
  • Create a new VM with the required hardware version and attach the existing disk from the VM

I found the third option is the quickest way and provided a little more detail below.

  • (optional) Make a clone of the VM or template, if you want to keep a template for both the existing and previous hardware version
  • Gather the VM’s virtual hardware (CPU, Memory, Hard disks – including the name and location of each VMDK files, Controller Type, Network Adapter’s network and type, Guest OS and Version)
  • Remove the VM from inventory
  • Create a new VM
    • Select the required hardware version in Compatibility
    • VM.Hardware.Version.Downgrade.01
    • Select the guest OS and version to match the original VM
    • VM.Hardware.Version.Downgrade.02
    • Customize the CPU, Memory, Controller, Network Adapter type to match the original VM
    • Add a new existing hard drive and select the VMDK file to match the original VM
    • VM.Hardware.Version.Downgrade.03
  • Once the new VM is created, right-click on the VM and select Edit Settings and remove the first hard disk that is added by default
  • Here are the screenshots to show the hardware version before and after the downgrade
  • VM.Hardware.Version.Downgrade.04VM.Hardware.Version.Downgrade.05

vSphere Memory Ballooning

I know nothing about memory ballooning until I read this post – “How does memory ballooing work”.

Here is my understanding of this topic:

What is memory ballooning?

The ballooning driver (part of VMware Tools) frees up the VM guest memory (active memory + free memory) and makes it available to the Hypervisor (so avoid hypervisor swapping).

How does it work? and how does it impact performance?

The ballooning driver will balloon all ram down to the minimum recommended memory for each operating system + Mem.AppBalloonMaxSlack (16 MB by default, it’s adjustabe from 1 MB – 256 MB). The minimum recommended memory value is set by the operating sytem vendor and hard coded by VMware. It cannot be changed.

For example, RHEL 7’s minimum recommended memory is 512 MB. The ballooning driver will balloon all ram down to 528 MB (512 + 16). If an application in the OS requests more than 528 MB memory, it causes the guest operating system to swap/page. This is better than hypervisor swapping, but still a really bad impact for performance.

 How to avoid Ballooning?

  • Avoid over provisiooning server memory (the best option)
  • Make a reservation for server memory (bad idea in most respects)
  • Do not install VMware Tools (bad idea in every respects)

VMware vRealize Production Test Tool

VMware KB2134520 documents the steps to use vRealize Production Test Tool to validate and test the vRealize Automation configuration and identify potential configuration failures, password expiration, certificate errors and more.

VSAN Storage Controller Cache

In “VSAN 6.0 Design and Sizing Guide” v.1.0.5, April 2015, under Storage controller cache considerations section, “VMware’s recommendation is to disable the cache on controller if possible. Virtual SAN is already caching data at the storage layer – there is no need to do this again at the controller layer. If this cannot be done due to restrictions on the staorge controller, the recommendation is to set the cache to 100% read.”.

However in “VSAN Ready Nodes”“VSAN Ready Nodes”, the storage controller in some configuration includes the cache. For example, the storage controller in the Dell PowerEdge R630.

VSAN.Dell.PER630.Controller

Why includes the controller cache when VMware recommends disabing it?

It turns out the controller cache allows the larger queue depth – see this.

In “VSAN 6.0 Design and Sizing Guide”, VMware recommends the minimum queue depth is 256, and choose a controller with a much larger queue depth when possible.

For more information about the queue depth, see the following

Use WinSCP to Transfer Files in vCSA 6.7

This is a quick update on my previous post “ Use WinSCP to Transfer Files in vCSA 6.5 ”. When I try the same SFTP server setting in vCSA 6.7...